")
")
")
Managing Participants
- 4.1 How to add a new participant
- 4.2 How to edit a participant
- 4.3 How to copy a participant
- 4.4 How to access a participant's login credentials and QR code
- 4.5 How to send an e-mail to a participant
- 4.6 How to delete a participant
- 4.7 How to enable the web application for a participant
- 4.8 How to disable the web application for a participant
- 4.9 How to start the e-mail notification of this participant
- 4.10 How to stop the e-mail notification of this participant
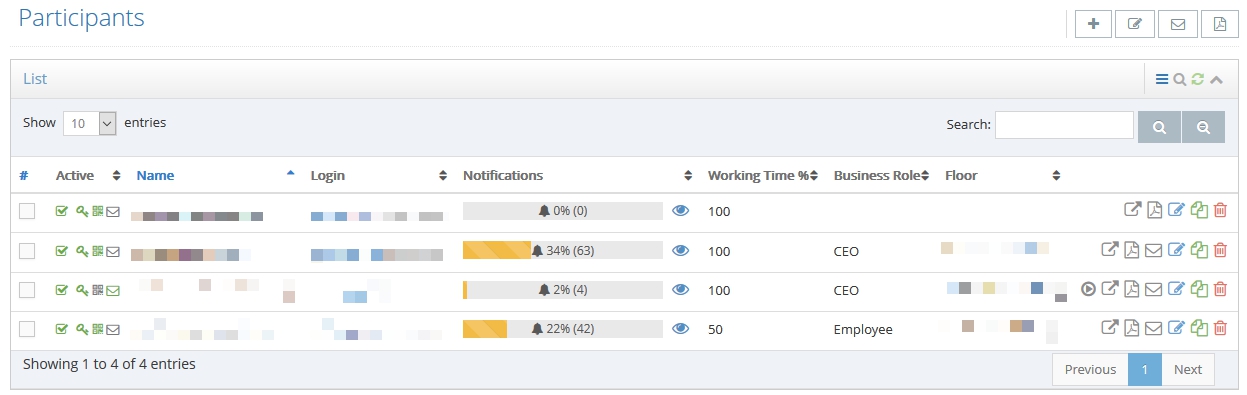
Adding all participants of your study to your recently created project should be the next step. If you go to Project Setup > Participants, you will find an overview of all participants you have already added along with several possibilities to manage them. They are organised in a dynamic table which allows you to order and search your participants. With each participant a variety of buttons is provided allowing you amongst others to edit and copy the participant's data and settings. If you wish to add a new participant, simply click the grey plus icon in the upper right corner of your browser.
A variety of settings are provided for each participant:
Active: Decide whether or not the participant is active and allowed to sign in to the mobile and web application.
Login via Username/Password: Decide whether or not the participant may use the login credentials for signing in.
Login via QR Code: Decide whether or not the participant may use the QR code for signing in.
Use e-mail notifications: Activate the checkbox if the participant should be notified by e-mail.
Login: The participant's username. A random username is automatically generated to guarantee anonymity.
Name: The participant's first and last name.
Description: You may enter a short description of the participant.
Language: Choose the language for this participant.
E-Mail: The participant's e-mail address. It is necessary if the participant should be notified by e-mail.
Phone: The participant's phone number.
Mobile: The participant's mobile phone number.
Dimension 1 - 5: Here, you can assign up to five fully customisable dimensions to the participant.
Working Time [%]: Is the participant only working part-time? Then adjust the working time. Default value is 100% for a full-time job.
Use Project Settings: If the participant has different notification times than the project's default, you may enter them here.
How to add a new participant:
1. In the administration of your project, go to Project Setup > Participants.
2. Click the grey plus icon ![]() in the upper right corner of your browser.
in the upper right corner of your browser.
3. Fill out the form displayed in the dialog.
4. Click Save.
How to edit a participant:
1. In the administration of your project, go to Project Setup > Participants.
2. Find the participant you want to edit and click the blue pencil icon ![]() .
.
3. Enter your changes.
4. Click Save.
How to copy a participant:
1. In the administration of your project, go to Project Setup > Participants.
2. Find the participant you want to copy and click the green copy icon ![]() .
.
3. Enter any further settings in the form displayed in the dialog.
4. Click Save.
How to access a participant's login credentials and QR code:
1. In the administration of your project, go to Project Setup > Participants.
2. Find the participant and click the grey Adobe Acrobat icon ![]() .
.
3. Your browser will automatically download the participant's sheet.
4. Check your default download folder to find the PDF.
How to send an e-mail to a participant:
1. In the administration of your project, go to Project Setup > Participants.
2. Find the participant and click the grey envelope icon ![]() .
.
3. Select a predefined e-mail template or enter a custom subject and body.
4. If you wish, you may add additional participants as recipients.
5. Click Save to send your e-mail.
How to delete a participant:
1. In the administration of your project, go to Project Setup > Participants.
2. Find the participant you want to delete and click the red trash can icon ![]() .
.
3. Confirm your decision to delete the participant by clicking OK.
Please note, that the deletion of participants is no longer possible once your multimomentanalysis has begun. It is only possible during the planning and testing of your project.
How to enable the web application for a participant:
1. In the administration of your project, go to Project Setup > Participants.
2. Find the participant you want to edit and click the blue pencil icon ![]() .
.
3. Enable the checkbox Login via Username/Password.
4. Click Save.
How to disable the web application for a participant:
1. In the administration of your project, go to Project Setup > Participants.
2. Find the participant you want to edit and click the blue pencil icon ![]() .
.
3. Disable the checkbox Login via Username/Password.
4. Click Save.
How to start the e-mail notification of this participant:
1. In the administration of your project, go to Project Setup > Participants.
2. Find the participant and click the grey start icon ![]() .
.
How to stop the e-mail notification of this participant:
1. In the administration of your project, go to Project Setup > Participants.
2. Find the participant and click the grey stopicon ![]() .
.